Looking to sell the domains set-inform.com and setinform.com. HMU @ either domain.
Domains for Sale
Reply
Looking to sell the domains set-inform.com and setinform.com. HMU @ either domain.

I’ve had a desire to turn this Pacman Ghost Light into a status indicator for my monitoring since like 2016. Somewhere around 2017-1028 I started accumulating hobbyist electronics parts — soldering gear, various Micro:Bit, Espressif, and RP2040 boards, breadboards, wiring, misc. sensors, etc. — with all sorts of intended projects… that never came to fruition because, frankly, I don’t like soldering stuff because I was very bad at it. And for many project ideas I’ve had, if I procrastinate long enough, the market eventually produces something I can just buy and convert to Tasmota or ESPHome.
Recently I’ve had an idea for something that I need strongly enough to overcome my foot-dragging. But it’s complicated, with several types of components involved and safety implications for some of our pets. I need to build up some experience before taking it on.
Over the past month or so I’ve worked on a few “easy” things where the end result was pointless but the experience of doing it was beneficial. My soldering is now ok-ish. I’ve done stuff with the Arduino IDE and ESPHome, on ESP32 and Pico W boards, using breadboards and buttons and tiny OLED screens and RGB LEDs. Two weeks ago I noticed my Pacman Ghost Light being boring and knew I’d be taking it on as my first actually useful project.
Pictured above is my first go at it, using a Pico W, several RGB LEDs for the body, and the original white LEDs in the eyes. I initially got it going a week or so ago using ESPHome and the Uptime Kuma HACS Integration. Over the past few days I’ve completed a 2nd one with CircuitPython that polls Uptime Kuma directly and adds RGB LEDs to the eyes, running on an ESP32-C3 board. And circled back to put that CircuitPython code on the original.
And last night I published the code on GitHub so now anyone can build one. Well, if they can figure out how to put all the hardware bits together — as a rank beginner, I don’t really want to write up a full tutorial.
When I have more roundtuits I’d like to add some Pacman sounds and the ability to connect to multiple Uptime Kuma instances, but for now I’m going to move on to the next project.
My ambitions to deploy UK Ultras to the exterior walls of the cabin were quickly dashed at realizing the cable runs would be challenging for the limited time available — cold weather prep was the priority — so I shoved one in the attic, replaced the nanoHD in the kitchen, and chucked that nanoHD into the “attic” space over the covered front deck.

Every other time I’ve been an early adopter of a new Ubiquiti AP, I’ve been burned by firmware bugs and had to set them aside for a while, so I definitely consider it a plus that the UK Ultra is just a repackaging of the UAP-AC-M. They’re working great! And my fixed WiFi devices that were struggling now aren’t.
On the Home Assistant front, I arrived at the cabin to find problems with both of my reflashed Switchbot plugs. One was running ESPHome’s BLE scanner and seemed to be stuck in a reboot loop, clicking the relay rapidly. There’s no way to open up the plug without ruining the case so it’s impractical to rescue with a direct serial reflash.
The other ran BLErry on Tasmota but somehow the startup rule got turned off. That took me a while to figure out so in the mean time I deployed a fresh T-Dongle-S3 with ESPHome and flipped the rest of my LYWSD03MMC sensors running PVVX firmware to BTHome broadcasts.
I’d rather stick with Tasmota — in my opinion, it’s much better for the casual tinkerer, and I appreciate that they say “If it ain’t broke, don’t upgrade the firmware,” compared to Home Assistant constantly nagging to update ESPHome devices — but BLErry overwhelms an ESP32 C3 CPU at a relatively small number of BLE devices. And it’s nice to just be able to set up the sensor and have Home Assistant find it automatically via the ESPHome proxy.
Today I discovered that Home Assistant added support for tracking iPhone BLE broadcasts through the Private BLE Device in release 2023.10. I’d previously experimented with ESPresense for this and thought it was great… but needing to double up on ESP-based BLE scanners stopped me from putting it to real use. Unfortunately, this native HA device type doesn’t provide an Entity for the area / room of the tracked device — instead it sets an Attribute to the MAC of the Bluetooth device that saw it — so it’s not as straightforward as ESPresense to use for more granular presence.
I also discovered that ESPresense pulls in BLE sensor data, if it broadcasts in ATC441 format, but it doesn’t populate the MQTT topics for Home Assistant discovery. Someone came up with a NodeRed flow to work the magic, so I’m giving that a try at home, but I don’t love the added dependency.
So now I’ve found two solutions that can address both of my BLE use cases… and each are kinda sucky at one of them.
Maybe I should be converting the sensors to Zigbee firmware. I’d previously used a few Zigbee sensors and was happy enough with them, but I went all-in on these BLE sensors for the display.

Over my holiday break I freed up a US-8-60W in my office, that I’m going to use to replace a larger under-utilized switch in my garage, to bring back to my office to free up the other US-8-60W, which I’ll probably take up to the cabin, trying to avoid feeding more money into the Ubiquiti beast as much as I can… So imagine my surprise to be reaching for my wallet this morning to order a brand-new product, a unicorn of an AP called the Swiss Army Knife Ultra1:

It’s an IPX6-rated, connectorized, upright, low-profile AP. Pole mount, wall mount, and possibly “desktop” mount — the marketing photos on the store show a desktop holder but nothing has been announced — so extremely versatile in terms of usage and placement. Launched on the US store yesterday for $109 but when I looked again this morning it was reduced by $20, making it ten bucks cheaper than the ancient-and-not-IP-rated UAP-AC-M, hereto their only connectorized WiFi AP of the AC era.
The Reddit spec nerds immediately complained that it’s WiFi-5, which is a somewhat puzzling choice given that this exact product with WiFi-6 would be incredibly disruptive and could command a much higher price, but I’m gonna assume that Ubiquiti knows what they’re doing here. I’d bet that the UAP-AC line is nearing the end of being viable to manufacture — those chipsets are from 2012! — and they needed something that could slot right in for the UAP-AC-M.
Personally, I’d been hesitating to add outdoor APs to the cabin because they’re all so unsightly, and I hadn’t wanted to deal with overhead mounting in the soffits or deck ceilings, where they’d still be unsightly if less overtly visible. I was giving serious thought to buying used upmarket APs, maybe Aruba IAP or Instant On, to get some less obnoxious wall-mount options.
So this product arrived at exactly the right moment with exactly the right features and I’m in for two to start.
Roughly 24 hours ago, the primary Internet at our mountain cabin went down for 90 minutes. No big deal, we’re not there, and there’s an LTE backup on WAN2. However, the “Site Magic” VPN tunnel never re-established itself.

In the past I’ve run EdgeRouters and USGs w/ IPSec tunnels so I’m familiar with Ubiquiti’s self-imposed challenges with multi-WAN, and that even with single-WAN the IPSec tunnels are not as resilient as they ought to be.
But Site Magic is supposed to be “magic.” It’s supposed to make it all better. It’s supposed to be so good that they don’t need bother giving me any tools to troubleshoot or give it a kick in the ass when it doesn’t work. A cursory Google search didn’t lead me to any “secret” CLI commands to provide more than the unifi.ui.com interface.
I’d say I’m disappointed… but, honestly, this kind of thing is typical of them and is why I want to quit their gateways.
Randomly came across a post looking for a method to disable NAT on the ARM-based UniFi routers… and, as usual, nobody had suggested the easy way.
The hard ways are:
But there is another way that doesn’t require running scripts on the device, doesn’t require reconfiguring all the Networks, and keeps all the traffic flowing through the UniFi router.
Simply have the other router somewhere on the LAN side and create two static routes pointing to it:
And that’s it. Those routes “win” over the NAT-ed WAN 0.0.0.0/0 route because they’re more specific.
Ubiquiti has launched the $149 UniFi Express, which adds to the UXG-Lite a WiFi AP, a tiny screen, the ability to host its own UniFi controller or be adopted to an external one, and the flexibility to be used as just a router or AP, with or without wireless meshing.
Edit: Apparently it also subtracts IDS/IPS. Which I’ve never been shy about calling absolutely useless and of negative value.
CPU and RAM specs have not yet been disclosed and apparently none of the YouTube shills Influencers that Ubiquiti seeded with free devices ahead of the launch thought that was a detail worth digging into.
Edit: So without IDS/IPS, it probably limps along with the same 1GB RAM and dual-core A53 as the UXG-Lite.

Against my better judgement, I’ve ordered one for the cabin. Probably won’t find the roundtuits to actually deploy it for a while as I have no idea what I’ve done with the CK Gen2+ that I was using there previously for Protect before the UDM flaked out.
Ubiquiti is finally launching a replacement for the decrepit USG. The UXG-Lite will be available for purchase from the Ubiquiti store on 11/20 for $129 and is roughly a de-spec’d UDR — A53 dual-core, 1GB RAM, 2x 1GbE ports, and an unknown amount of on-board storage that is hopefully eMMC but largely irrelevant.

I struggle to understand why they continue down this path of separate product lines for on-device and externally run UniFi Controllers. Yes, this device would need more RAM and possibly storage but that shouldn’t move the BOM much and they likely could have made that up with other cost optimizations that would go unnoticed.
In theory I should love this for my cabin in the mountains, where I’m wasting a UDM Pro SE on 100/4 Internet and 4 cameras and all the blinken lights are supremely annoying because there’s nowhere to tuck it away out of sight… but I think about it and dread the idea of dusting off a CloudKey Gen2+ to run the UniFi Controller and Protect to run the tiny number of UniFi/Protect devices in place. My ideal device there would have three assignable GbE interfaces, no PoE or AP, able to run the UniFi Controller and Protect, with an accessible M.2 or 2.5″ bay to be used for continuous recordings. Which, looking at this and the UDR, seems like a pretty reasonable $179 product.
But ultimately I’ve been leaning towards just replacing all of my UniFi routers with mini PCs and $129 easily buys an Intel N100-based dual-GbE system complete with enough RAM and storage to run a few VMs / Containers alongside whichever routing platform I’d choose. While I would never pretend that’s a fair comparison to what Ubiquiti offers, my mindset is that their products used to be extremely “hacking friendly” — which helped make up for their glacial pace of delivering and improving functionality — and I haven’t been feeling that love for an extremely long time. The only thing holding me back is that for my home network it’s too big of a project for a rip-and-replace cutover. It’d be so much easier if show configuration commands were still a thing.
Having been in the ISP and hosting industries from roughly 1996-2014, living through the transition of mail servers from being something that everyone runs themselves as a matter of course to a nightmare of spam, block lists, and becoming the favorite entry point of threat actors that any rational person and company chooses to outsource to entities with far more resources to dedicate to the challenges, I’ve long scoffed at people who want to run mail servers at home.
Your ISP, the providers of mail services large and not-so-large, and the purveyors of block lists and anti-spam/threat gateway services all want to make this very difficult for you. Deliberately.
People find a way, often using the free tier of some bulk mail sending service to route their outbound mail, or perhaps getting lucky DIY-ing it with a VPS provider who has managed to keep their IPs off the naughty lists.
I prefer not to be a freeloading non-paying customer of anyone, as “free” services and “free tiers” over time tend to become more restrictive or disappear, and I know it’s foolish to believe any VPS provider that allows SMTP traffic isn’t going to eventually have a block list go nuclear on their entire IP space, so I’ve long chosen to pay Microsoft for their lowest-cost o365 account to have e-mail for my own domains and I think the $6/m or whatever is a fair price to pay.
But I’ve had this theory that one could use Microsoft’s Exchange Online Protection Plan, which costs just $1/m* per user, to cheaply avoid many of the pitfalls of self-hosting e-mail servers. Today I put it to the test with a domain I’d registered last week. Partly to prove the point and partly for the opportunity to mess around with Synology Mail Plus.
It absolutely worked. Here are the steps I followed:
Microsoft could do a much better job of unifying all these different administration portals, but overall it wasn’t that bad. I tested by sending an e-mail to my Gmail account and it was successfully delivered to my Inbox, having passed SPF, DKIM, and DMARC:
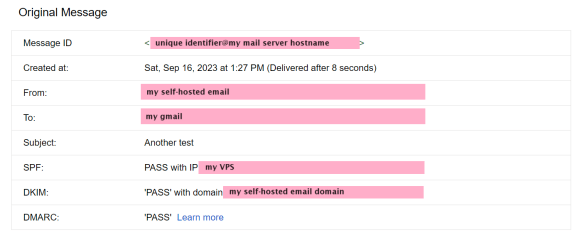
And, mind you, this was a first message from a domain on a less-common .TLD, registered days ago with no prior reputation.
$1/m* seems pretty cheap to ride on Microsoft’s coattails for e-mail delivery, along with getting 1-day of inbound mail spooling, plus whatever value Exchange Online Protection provides as an anti-spam gateway. It’s not abusing the service in any way — this is what any cloud-based anti-spam service needs to function. EOP is special because Microsoft o365 services don’t have monthly minimum charges.
Of course, there are providers out there specifically offering inexpensive inbound MX spooling and outgoing SMTP relay services to the frugal self-hoster. Dynu, for example, is $9.99/yr per domain and service.
I might be halfway to talking myself into bringing all of my e-mail home. For my collection of domains and potential user count, EOP is dirt cheap.
* Plus the price of a VPS if dealing with port blocking, but we all need a VPS for something anyways, right? And that EOP license is “per user” but Microsoft won’t know how many users you have unless they ask you / audit your o365 licensing, and “Yep, just the X, it’s just for me [and my X-1 family members / friends / employees], and EOP is the only service needed right now” ought to be a perfectly acceptable response.
I’ve been on a slow slog to remove containers from my home and remote UDM Pro and UDM Pro SE so that I’m not trapped on old firmware, but I finally got it done. It sucks that UI chose to remove podman entirely once they decided to stop using it. Let that serve as a reminder that today’s UI isn’t the hacker-friendly Ubiquiti that so many of us fell in love with.
Finally having seamless site-to-site VPN via Site Magic sure is nice tho. If they had a way to integrate non-UniFi gateways it could be a full replacement for my ZeroTier tunnels but I doubt that’ll happen. I might go back to running ZeroTier directly on my routers since they both now have apt, as I liked having one central place to manage all the inter-site routing.